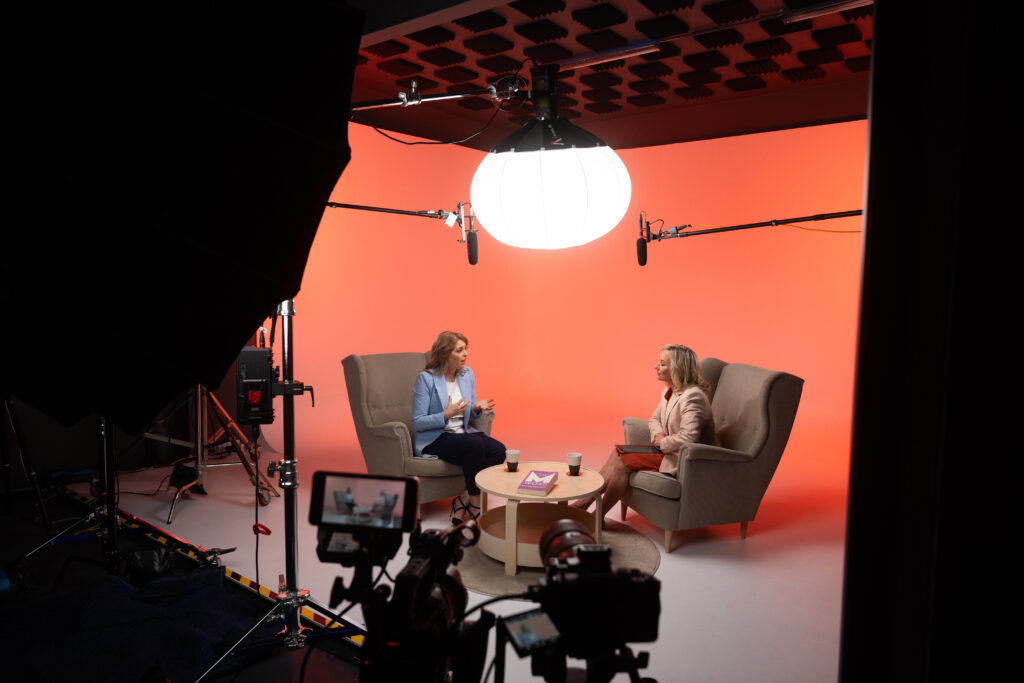
A two-camera interview setup is crucial for editing. There are some moments when the interview is not running smoothly. With only one locked frame, those changes can be difficult to hide. The second camera gives the editor another option. It does not have to be a dramatic angle.
The two pictures need to work together. You can easily check the Existing interview setup guide. Read the article below to find out the best two-camera setup.
What Does The Second Camera Actually Add?
How to film an interview? Here is the situation: there is an executive that answer a question for 2 minutes. From that answer, the editor wants to remove some minutes for the sake of a good final result.
On a single camera, those edits may leave visible jumps in the face and shoulders. The other angle provides an opportunity for the editor to make the change even in the picture movement from frame to frame.
Where Should The Cameras Sit?
Build the A camera first. The interviewer takes their position, the subject settles into the chair, and the main composition is worked out from there. Once that frame is locked, bring in the B camera.
The best positional setup of the B camera in a conventional interview is about 35 degrees from the A one. The room will determine the final position. So will the lens. The B camera should give you a proper change in perspective.
How Do You Match Two Different Camera Views?
Sony FX-series bodies such as the FX3 and FX6 are commonly suited to this type of work. However, the profile cannot be adjusted automatically.
Set the frame rate and shutter consistently. Keep the picture profile under control. When one camera movement is not synchronized with the others, then the change is quite obvious.
The lenses do not have to be identical. What matters is that the difference is intentional.
Lighting Deserves The Same Treatment.
The count of lights and cameras is not the only point that matters. The room, background, windows, and desired look matter more.
Walk around with both cameras before rolling. A key light may look fine from A and produce glare on glasses from B. A background fixture may also become much brighter from the second position.
How Much Should The Framing Change?
Enough that an editor can make the cut without having to explain why the camera moved. Adjust camera A in medium close up, and tight shot for the camera B. That combination works best for a long interview where the speaker is the main point.
For a workplace interview, I may do the opposite. The A camera frame will capture the whole room while camera B is closer to the speaker.
What I would avoid is two frames that are almost the same. An extreme wide shot and a very tight face shot can create the opposite problem. The transition becomes too obvious.
The useful range sits somewhere between those two extremes. If the location is a major part of the production decision, our Studio vs on-site interview guide goes into that choice separately.
Where Does B-Roll Come Into The Edit?
Suppose an executive talks about a manufacturing process. Instead of cutting from A to B three times while removing parts of the answer, the editor can place footage of the production floor over the dialogue.
That footage needs to have a reason to be there. Capture people actually working. Record the equipment being used. Get details of products and documents.
Do not make every interview B-roll shot five seconds long. Give the editor some room at the beginning and end of the take.
On a real production, I would rather come back with a smaller collection of longer, relevant shots than dozens of random clips that look nice but have no connection with the interview.
What Should The Crew Check Before Pressing Record?
The final check of a two-camera interview setup does not need to be complicated.
- Look at both compositions.
- Check the subject’s eyeline.
- Adjust the camera visibility in each frame
- Lock white balance.
- Check exposure.
- Confirm focus.
- Match frame rate and shutter.
- Look for reflections in glasses.
- Check the background.
- Monitor the dialogue.
- Record room tone.
Check the Audio recording standards for the placement and other requirements.
What Does The Setup Look Like On An Actual Shoot?
Work primarily in camera A first. You can move the B camera without distracting the composition. Then record a short test.
Do not judge everything from the live monitors. Watch the recorded clips. Check how skin tones look beside each other. Look at the background. Check the reflection and light stand too.
Once that is sorted, check the audio again, record room tone, and start the interview. Camera placement should give the editor somewhere useful to cut, rather than leaving them with two nearly identical recordings.
At SNXP Studio, the camera plan can be worked out together with the lighting, audio, and location before filming begins. The two-camera interview setup is practical in the edit.
Frequently Asked Questions
Do both cameras need the same lens?
Not necessarily. Make sure that the footage is still in place with the same scene.
How far apart should the two cameras be?
It depends on the room, subject, and background. The two frames should have a clear difference.
Can three lights work for a two-camera interview?
Three lights can be enough for a relatively controlled room. A larger location may call for five or six fixtures, particularly when the background needs its own treatment.
Does the B camera always need to be closer?
A wider B frame can be more useful when the workplace or location is part of the story.